Sew the Perfect Circle Skirt
You may have read up on and tried our previous tutorial on the 20 minute dish towel dress in previous weeks. Keeping with our same mantra of easy and quick DIY ideas, we present the 30 Minute Perfect Circle Skirt.
This beauty of a skirt takes thirty minutes from start to finish and only requires a couple of basic tools and supplies. Best of all, there are no patterns to print or tape together. This is going to be so easy you’re going to want to make them all the time! Which is great, because we’re here to show you items you can whip up at a drop of a hat that will look store bought, be well made, and be cherished for years to come.
Let’s get started!
Tools & Supplies:
2.5 yards of cotton fabric of your choosing
You can find our Emoji fabrics here & here. You can also try your local walmart store and see if it’s in stock (It goes fast!)
1 zipper the length of your skirt
1 hook and eye
Scissors, tape measure, pins, pen and sewing machine
Six easy steps:
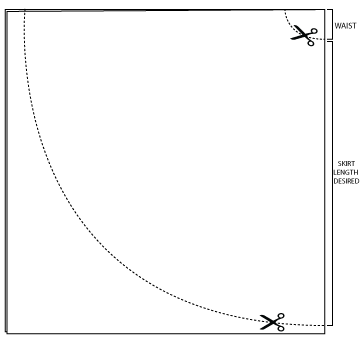
Step 1: Fold your fabric in half horizontally and then again vertically.
a. Set fabric aside and measure your natural waist at the narrowest point using your tape measure (usually 2-3 fingers above your belly button). Don’t pull the measure tape tightly; rather let it lay naturally against you. However many inches it is, add 1” for seam allowance/ease. (e.g: waist is 37” + 1” = 38”).
b. Find the radius of your waist measurement by dividing by 6.28. Calculators are your friend. [e.g: 38\6.28 =6.1” radius (we’ll keep it simple and round down to 6”)]
Step 2: Now if the math didn’t scare you off, and we hope it didn’t, proceed to mark and cut your fabric as illustrated by the below diagram.
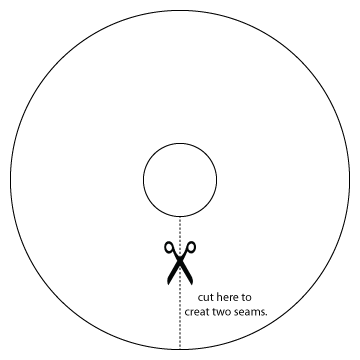
 Step 3: Open up your fabric and it should look like this:
 Cut into your fabric as shown below:
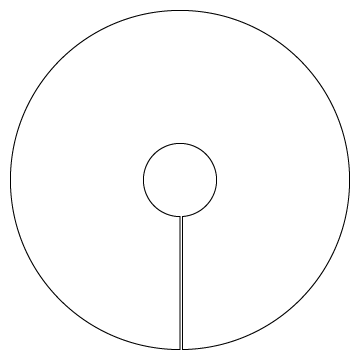 Step 4: First, zig-zag or serge your two new seams you just created so that they won’t fray. Turn them in ¼” on each side and iron in place. Zig-Zag or serge your waist so it won’t fray. Turn down ½” and top stitch in place.
Step 5: Turn up the hem of your skirt ½” and then turn it up again 1” to enclose the raw hem. Top stitch in place using coordinated thread
a. You can also use bias tape. Just be sure to zig-zag or serge the hemline before doing so, so it wont fray.
Step 6: Place the zipper butted up against the fold of the seams so its seam-to-zipperteeth and pin in place. Do this to the other side as well and then neatly sew with a top-stitch with coordinating thread. Don’t be afraid of zippers, they are so easy and if you sew as close as possible to the teeth of the zipper, there is no way you can do wrong.
a. For a more professional look, top-stitch again a little less than ¼” apart from your initial stitches to give it that double top-stitched look.
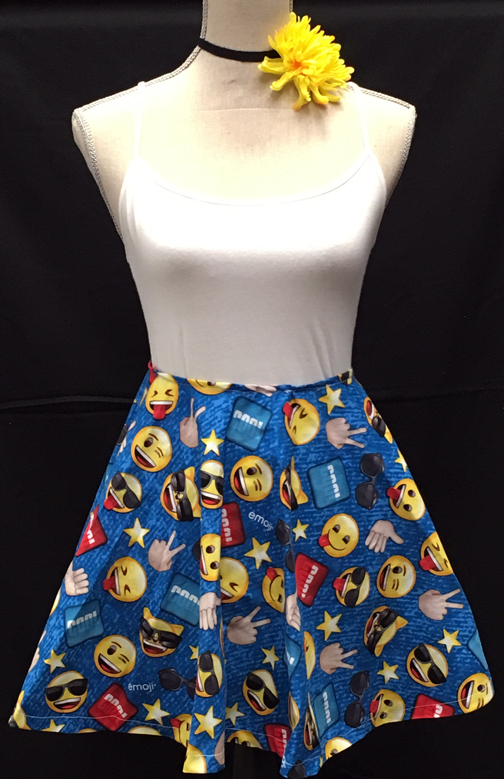
Your finished skirt with everything sewn, and zipper installed:
Step 4: First, zig-zag or serge your two new seams you just created so that they won’t fray. Turn them in ¼” on each side and iron in place. Zig-Zag or serge your waist so it won’t fray. Turn down ½” and top stitch in place.
Step 5: Turn up the hem of your skirt ½” and then turn it up again 1” to enclose the raw hem. Top stitch in place using coordinated thread
a. You can also use bias tape. Just be sure to zig-zag or serge the hemline before doing so, so it wont fray.
Step 6: Place the zipper butted up against the fold of the seams so its seam-to-zipperteeth and pin in place. Do this to the other side as well and then neatly sew with a top-stitch with coordinating thread. Don’t be afraid of zippers, they are so easy and if you sew as close as possible to the teeth of the zipper, there is no way you can do wrong.
a. For a more professional look, top-stitch again a little less than ¼” apart from your initial stitches to give it that double top-stitched look.
Your finished skirt with everything sewn, and zipper installed:
 Troubleshooting:
Was the waist too big? Not a problem! Before you zig-zag the waist in step 4 do the following:
Go to the seams you created and measure two finger widths to the side. Pinch the fabric and scoot it over in any direction to create a pleat. Pin in place. Zig-zag or serge waist as per step 4.The size of the pleat depends on how big the waist was. Example: If it was 4” too big, than each pleat would be 2” pinched, and would appear as 1” width once laid flat (since one of the inches is hidden in the folding of the pleat).
Troubleshooting:
Was the waist too big? Not a problem! Before you zig-zag the waist in step 4 do the following:
Go to the seams you created and measure two finger widths to the side. Pinch the fabric and scoot it over in any direction to create a pleat. Pin in place. Zig-zag or serge waist as per step 4.The size of the pleat depends on how big the waist was. Example: If it was 4” too big, than each pleat would be 2” pinched, and would appear as 1” width once laid flat (since one of the inches is hidden in the folding of the pleat).


Step 3: Open up your fabric and it should look like this:
Cut into your fabric as shown below:
Step 4: First, zig-zag or serge your two new seams you just created so that they won’t fray. Turn them in ¼” on each side and iron in place. Zig-Zag or serge your waist so it won’t fray. Turn down ½” and top stitch in place.
Step 5: Turn up the hem of your skirt ½” and then turn it up again 1” to enclose the raw hem. Top stitch in place using coordinated thread
a. You can also use bias tape. Just be sure to zig-zag or serge the hemline before doing so, so it wont fray.
Step 6: Place the zipper butted up against the fold of the seams so its seam-to-zipperteeth and pin in place. Do this to the other side as well and then neatly sew with a top-stitch with coordinating thread. Don’t be afraid of zippers, they are so easy and if you sew as close as possible to the teeth of the zipper, there is no way you can do wrong.
a. For a more professional look, top-stitch again a little less than ¼” apart from your initial stitches to give it that double top-stitched look.
Your finished skirt with everything sewn, and zipper installed:
Troubleshooting:
Was the waist too big? Not a problem! Before you zig-zag the waist in step 4 do the following:
Go to the seams you created and measure two finger widths to the side. Pinch the fabric and scoot it over in any direction to create a pleat. Pin in place. Zig-zag or serge waist as per step 4.The size of the pleat depends on how big the waist was. Example: If it was 4” too big, than each pleat would be 2” pinched, and would appear as 1” width once laid flat (since one of the inches is hidden in the folding of the pleat).