This Easter picnic basket is fun to make and oh-so versitle!
Skill level: Advanced beginner
Easy to Make Picnic Basket
Can you believe it’s already April? And with April comes the time for hiding eggs, bouncing bunnies and goodie-filled baskets: Easter! Time sure does fly! But don’t worry; with this quick and painless step by step tutorial, we’ll have you ready for your Easter picnic holiday at the park in just 60 minutes flat!
Best of all, this will work double-duty as a beach bag, diaper bag, carry-all, you name it! With the kiddo’s on Spring-Break, you’re going to need and LOVE this bag in your life.
Let’s get this party started! You’ll need:
*1 yard outer fabric of your choice (we used: Evelyn’s Tulips by David Textiles, style: 117646-RH-3)
*1/2 yard lining fabric of your choice (we used: Tiny Strawberries & Flowers by David Textiles, style: 117554-RH-2)
*2/3 yard of heavy weight fusible interfacing (make sure it’s thick as this will be what will hold the basket’s shape)
*Cording, ribbon, etc of your choice for draw string, about 1.25 yards (we made ours out of fabric)
Instructions
Download this pattern and start cutting these pattern pieces per pattern instructions. It’s color coded and will print on standard printer paper 8.5 x 11. You can also follow the measurements and make your own pattern, or measure directly on the fabric.
Body of bag:
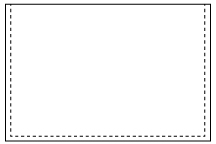
Iron on your fusible interfacing to each of your outer fabric pieces you just cut (pattern B). Fuse them to the wrong side of the fabric. Place the fabrics right sides together and sew around the sides and bottom using a ½” seam allowance. The picture below will show where to sew:
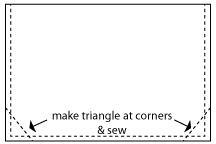
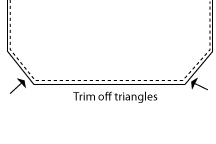
 Press the seams open. Make a triangle at each corner edge to make boxed seams. This will give the basket its shape. Measure and mark a line where the triangle will measure 5” and sew across to box off the triangle, then trim off the triangle. See below Illustration:
 Sew the lining together exactly like you did the outer fabric, but on the bottom seam, leave an opening about 3”-4” long. Do the boxed corners as well.
Turn the outer fabric right side out and place inside the lining so the right sides are together and sew along the top edge.
Through the opening you left in the lining, turn the basket right side out and sew the opening closed. The baskets already pretty much done!
Drawstring Closure:
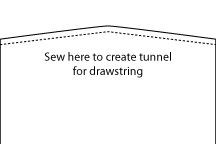
Holding both pattern A pieces right sides together, sew all around leaving a small 3” opening. Turn right side out and top-stitch closed. Fold down half inch along the peaked slope and top-stitch in place to create a tunnel for the drawstring:
Sew the lining together exactly like you did the outer fabric, but on the bottom seam, leave an opening about 3”-4” long. Do the boxed corners as well.
Turn the outer fabric right side out and place inside the lining so the right sides are together and sew along the top edge.
Through the opening you left in the lining, turn the basket right side out and sew the opening closed. The baskets already pretty much done!
Drawstring Closure:
Holding both pattern A pieces right sides together, sew all around leaving a small 3” opening. Turn right side out and top-stitch closed. Fold down half inch along the peaked slope and top-stitch in place to create a tunnel for the drawstring:
 Attach this piece to the basket’s top. Position it so it’s inside the basket and attach with a sturdy top-stitch, sewing right along the top. You’re going to want the sewn edge of the drawstring tunnel you previously sewed to face the inside of the bag.
Insert ribbon or cording of your choice through the draw string tunnel and you’re officially done with the fabric portion. Onto the strap!
Strap:
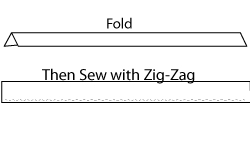
For the strap, iron on the interfacing to the straps fabric. Once fused, fold the fabric piece in half hot dog style so that the facing is visible to you. Sew down one side and across the bottom with a zig-zag stitch.
Attach this piece to the basket’s top. Position it so it’s inside the basket and attach with a sturdy top-stitch, sewing right along the top. You’re going to want the sewn edge of the drawstring tunnel you previously sewed to face the inside of the bag.
Insert ribbon or cording of your choice through the draw string tunnel and you’re officially done with the fabric portion. Onto the strap!
Strap:
For the strap, iron on the interfacing to the straps fabric. Once fused, fold the fabric piece in half hot dog style so that the facing is visible to you. Sew down one side and across the bottom with a zig-zag stitch.
 Turn strap right side out and top stitch closed.
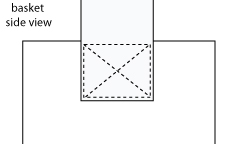
Attach the straps to either end of the picnic basket with a sturdy top-stitch. Giving it the below design will give it a more professionally done look:
Turn strap right side out and top stitch closed.
Attach the straps to either end of the picnic basket with a sturdy top-stitch. Giving it the below design will give it a more professionally done look:
 At this point, you can be done, but we love to maximize the functionality of everything so we added pockets! If you’d like to add pockets too, simply:
Pockets:
Cut 2 more of pattern B out of fabric of your choosing. Sew all around with a sturdy zig-zag stitch, leaving a 3” opening. Turn it right side out from this opening and top stitch closed.
From where you top-stitched, fold down 3” and sew with a top-stitch. Attach this piece to either side of the basket you choose with a top stitch.
At this point, you can be done, but we love to maximize the functionality of everything so we added pockets! If you’d like to add pockets too, simply:
Pockets:
Cut 2 more of pattern B out of fabric of your choosing. Sew all around with a sturdy zig-zag stitch, leaving a 3” opening. Turn it right side out from this opening and top stitch closed.
From where you top-stitched, fold down 3” and sew with a top-stitch. Attach this piece to either side of the basket you choose with a top stitch.
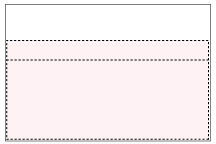 Last, sew two straight lines to create pockets. Space them out evenly.
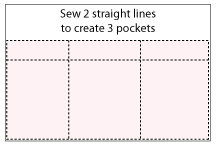 And just like that, you’ve added three pockets! Look at you, master sew-er!
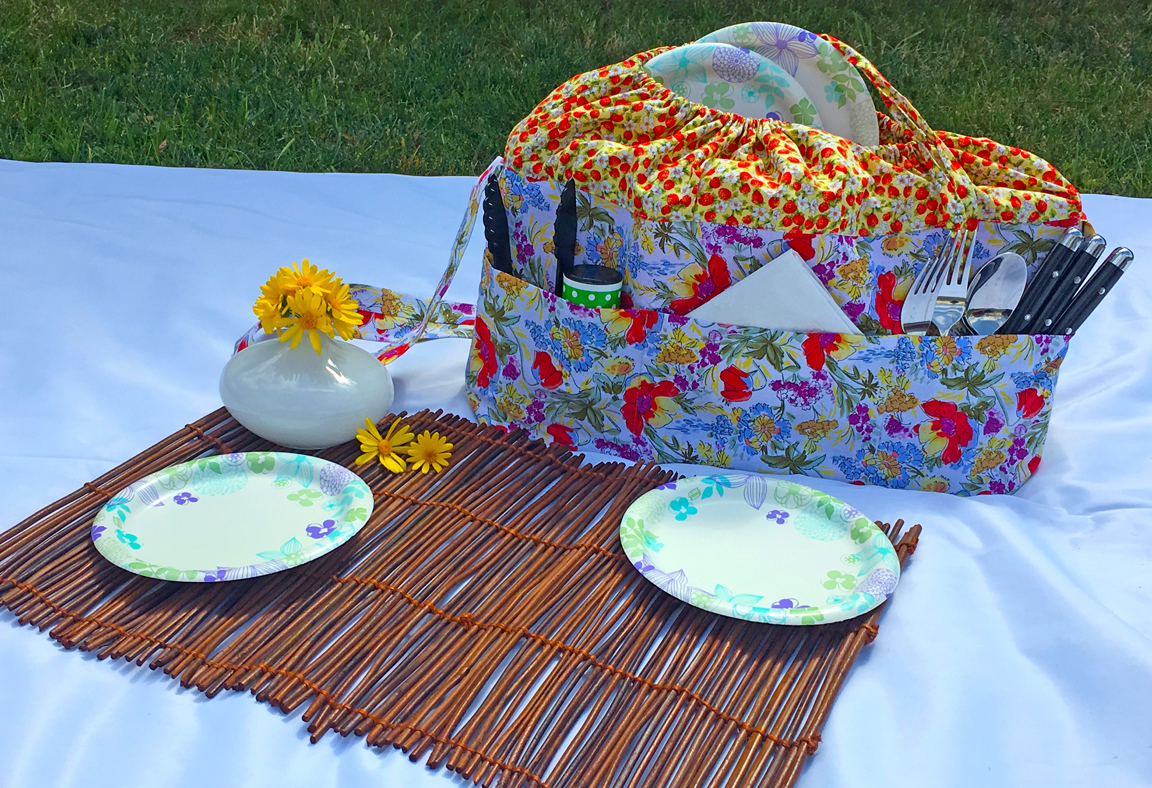
 Ready for a beautiful Easter Picnic!
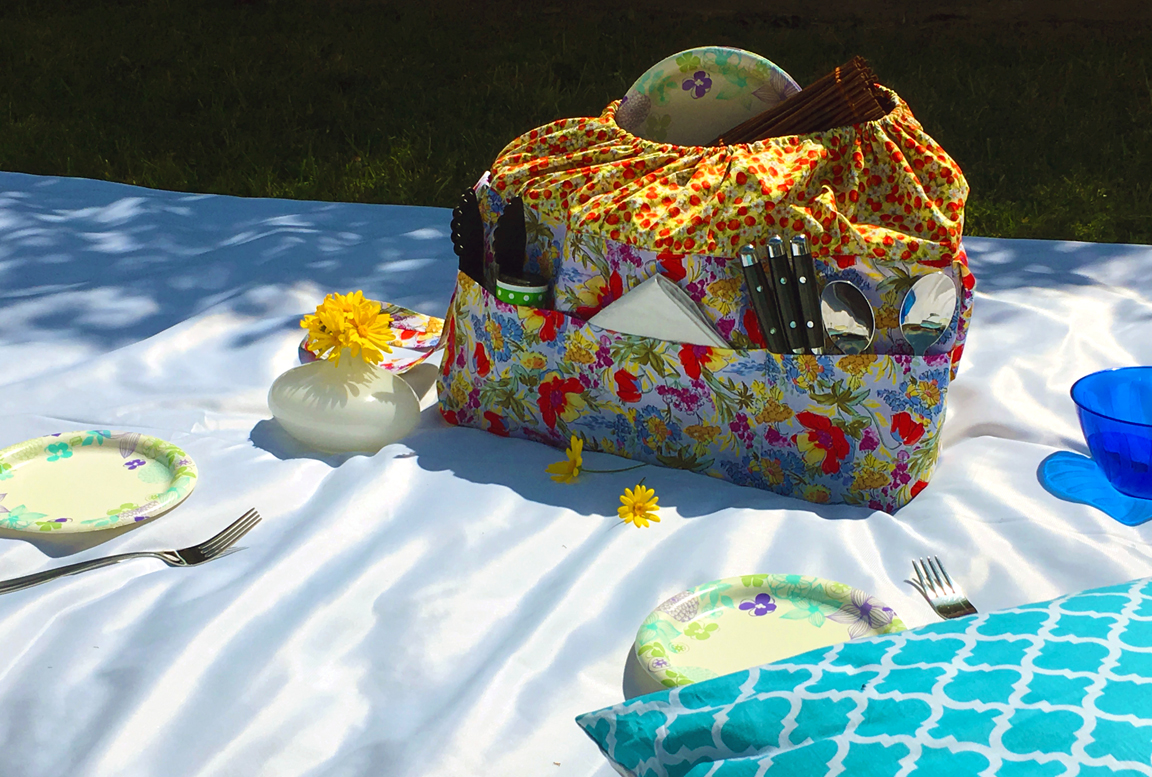 How'd we fare? We hope you give this a shot!
We can’t wait to stash all of our Easter picnic essentials in here for the big day! What will you put in your new ‘everything’ bag? Share with us on Instagram @davidtextilesinc and #easterpicnic so we can see!
How'd we fare? We hope you give this a shot!
We can’t wait to stash all of our Easter picnic essentials in here for the big day! What will you put in your new ‘everything’ bag? Share with us on Instagram @davidtextilesinc and #easterpicnic so we can see!

Press the seams open. Make a triangle at each corner edge to make boxed seams. This will give the basket its shape. Measure and mark a line where the triangle will measure 5” and sew across to box off the triangle, then trim off the triangle. See below Illustration:
Sew the lining together exactly like you did the outer fabric, but on the bottom seam, leave an opening about 3”-4” long. Do the boxed corners as well.
Turn the outer fabric right side out and place inside the lining so the right sides are together and sew along the top edge.
Through the opening you left in the lining, turn the basket right side out and sew the opening closed. The baskets already pretty much done!
Drawstring Closure:
Holding both pattern A pieces right sides together, sew all around leaving a small 3” opening. Turn right side out and top-stitch closed. Fold down half inch along the peaked slope and top-stitch in place to create a tunnel for the drawstring:
Attach this piece to the basket’s top. Position it so it’s inside the basket and attach with a sturdy top-stitch, sewing right along the top. You’re going to want the sewn edge of the drawstring tunnel you previously sewed to face the inside of the bag.
Insert ribbon or cording of your choice through the draw string tunnel and you’re officially done with the fabric portion. Onto the strap!
Strap:
For the strap, iron on the interfacing to the straps fabric. Once fused, fold the fabric piece in half hot dog style so that the facing is visible to you. Sew down one side and across the bottom with a zig-zag stitch.
Turn strap right side out and top stitch closed.
Attach the straps to either end of the picnic basket with a sturdy top-stitch. Giving it the below design will give it a more professionally done look:
At this point, you can be done, but we love to maximize the functionality of everything so we added pockets! If you’d like to add pockets too, simply:
Pockets:
Cut 2 more of pattern B out of fabric of your choosing. Sew all around with a sturdy zig-zag stitch, leaving a 3” opening. Turn it right side out from this opening and top stitch closed.
From where you top-stitched, fold down 3” and sew with a top-stitch. Attach this piece to either side of the basket you choose with a top stitch.
Last, sew two straight lines to create pockets. Space them out evenly.
And just like that, you’ve added three pockets! Look at you, master sew-er!
Ready for a beautiful Easter Picnic!
How'd we fare? We hope you give this a shot!
We can’t wait to stash all of our Easter picnic essentials in here for the big day! What will you put in your new ‘everything’ bag? Share with us on Instagram @davidtextilesinc and #easterpicnic so we can see!